Showing posts with label Projects. Show all posts

Wednesday, February 8, 2012

DIY Jewelry Rack

We made this DIY Jewelry rack the same time as our apron rack, but I just hung it up last weekend.  I couldn't decide what I really wanted to use the rack for- it was originally to be for hanging towels but we don't have a place for it in our bathroom.  After realizing that my jewelry box from college (a tackle box) just wasn't cutting it anymore, I decided to hang it in our bedroom for my necklaces.  


The wood was originally one long piece that we cut into two sections for the apron rack and this rack.  

100_2052


I purchased the wood for $1 at the local Habitat Restore.  We got the hooks for around $3-$4 each from Lowe's.  Jeremy and my dad cut the wood and drilled in the hooks this past summer.


Glad I'm finally putting this one to use!

Sunday, December 4, 2011

Wax Paper Garland Tutorial


I made a  faux capriz shell garland out of wax paper  for our Christmas tree.  I promised a tutorial and here it is!  This is one of my favorite DIY projects to date, and I hope you enjoy the tutorial!  if you have any questions just let me know!

Materials needed:

  • Wax Paper
  • Iron
  • Towel
  • Large circle paper punch (mine is 1.5 inches)
  • Scissors
  • Sewing machine and thread

(thanks to my sweet husband for taking these photos and video for me…they were taken on his iphone, so the quality isn’t very great.  But you’ll get the idea)

Step #1

Find a hard surface you can iron on and place a thin towel on top of the surface.  (I used our kitchen counter)

Step #2

Tear off 3 sheets of wax paper (as long as you want, but I just did about 2 foot sections at a time). 

waxpaper1

Step #3

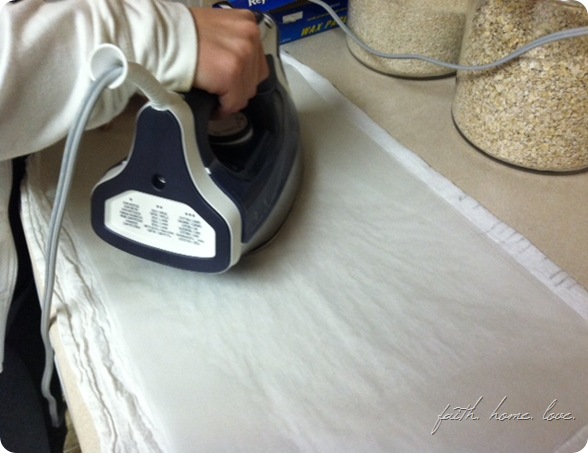
Line the sheets up evenly and place on towel. Begin lightly ironing over the three sheets.  They will begin to fuse together. 
wax paper2

It will look like this one ironed

waxpaper12

Step #5

Trim the ends so that they are even.

waxpaper4

Step #6

Begin to fold the wax paper back and forth in an accordion style fold.  (Making sure that the folded surface is large enough for your circle punch)

waxpaper5

waxpaper6

Step #7

Taking half of the accordion fold at a time, begin to punch out your circles.

waxpaper8

waxpaper9

Step #8

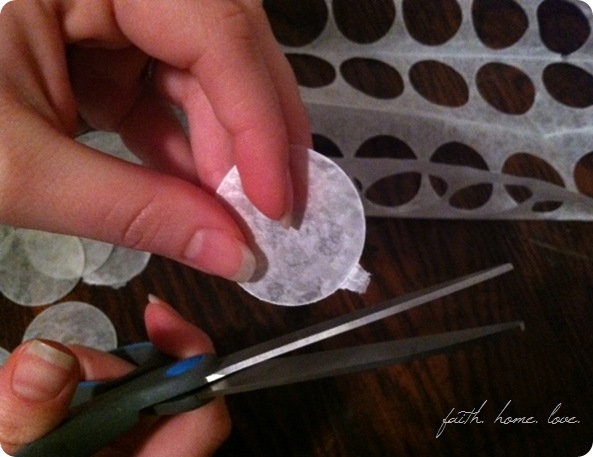
Once all of your circles are punched, look through to see if any need to be trimmed
waxpaper10

Step #9

Begin sewing your garland together on your sewing machine.  It is easier to just show you than explain it, so we did a short video clip to help you understand.


Once you’ve sewn all your circles, you can make more cirlces to make longer garland strands or cut and make several smaller.  I opted for several smaller because I am too impatient and wanted to see what they looked like on the tree!

waxpapergarlandchristmastree

I was inspired by these this tutorial for a garland and this tutorial for a chandelier

Friday, December 2, 2011

Oh Christmas Tree!


I love our white themed Christmas tree!  I have collected white and silver ornaments over the last couple of years on clearance after Christmas for when Jeremy and I got married.  So we had a few to put on the tree, and then I also made some ornaments.

My favorite part of the tree is the garland.  It has a capriz shell look to it, don't you think?  It is actually made from wax paper! Here is my tutorial for making your own wax paper garland

Here are some of the ornaments I had bought over the past couple of years.


The olive tree wood ornaments above were some that I bought on my trip to Israel.  They are so special to put on the tree, and remind me of my time there, as well as the true meaning of Christmas.  


Another one of my favorite parts is the tree skirt.  It is in fact a wedding dress train!  If you've been a reader for a while, you may remember this post where I mentioned using it as a tree skirt.  I worked at a bridal shop when I lived in VA, and we received this huge wedding dress train as a donation.  We couldn't sell it, so I I took it home and made a couple of things from it!  


I think it works great as a tree skirt! 
I only wish that I had some way to get those wrinkles out- any suggestions for how to get wrinkles out of real silk?  I tried to steam it, and I just made brown spots.  


Tuesday, November 22, 2011

Handmade Christmas Ornaments

For the past several years, I have been collecting Christmas ornaments for Jeremy and I to use once we got married.  Although I had a good number of ornaments saved, we still needed some additional ornaments to fill our first Christmas tree. 
I created some handmade Christmas ornaments using materials we had on hand- my goal was to not spend any money on our tree this year, and I was able to do that by using what I already had. 

The first ornament that I made was a coffee filter monogram ornament.  This is actually just a miniature version of the monogram wreath I made for our wedding. (tutorial for wreath found here) I will be posting a tutorial for this ornament this week.

diymonogramornament
I also made some accordion folded sheet music ornaments.  I think these add so much to the tree and are great space fillers.  I made several different sizes and designs. 
sheetmusic ornament
sheetmusicchristmasornament
The last ornament I made were these cuties from toilet paper rolls!  I saw this tutorial on pinterest and started saving paper towel and toilet paper rolls and made lots of them to put on the tree and to use as gift embellishments. 
toiletpaper ornament
I’ve enjoyed making ornaments that we can use year after year.  Being able to have handmade ornaments makes our tree even more special to me.  Have you started on any Christmas crafts?

Wednesday, November 16, 2011

Paperwhite Bulbs

This past weekend I planted some paperwhite bulbs in preparation for the Christmas season.  I love these beautiful and delicate flowers!  I did some research online and it was a simple process to plant the bulbs.

I just picked the bulbs up at Wal-Mart, emptied a big apothecary jar, took off the lid, filled the bottom with about an inch or two with pebbles (leftovers from our wedding centerpieces), put the bulbs in the center and covered them about half way with more pebbles.  You just keep water in it so that the bottom of the bulbs are sitting in water and that's it-  now I just get to watch them grow!


To my delight, they have already begun to spring up!  I am meticulously checking on them and just hoping that they bloom for Christmas.  It takes about 4-5 weeks for them to bloom so they should be right on time!


Monday, November 14, 2011

The Year of the Perfect Christmas Tree Pillow

This weekend I got Christmas fever and put out a few Christmas decorations here and there and made a pillow for Christmas.

Have you ever read the children's book The Year of the Perfect Christmas Tree? It is by far my favorite Christmas book and I highly suggest you find a copy if you haven't read it before.


I had an image of a pine tree from The Graphics Fairy and transferred the image onto canvas drop cloth using Citra Solv.  (Click here for a tutorial on using Citra Solv)


Once I transfered the image, I attached a ribbon to the top of the tree like the little girl and her father did in the book.  I don't have any red ribbon right now so I just used white.  Every time I look at my pillow now I am reminded of this sweet story.  

This was the first pillow cover that I have made and I made in the envelope style.  I was surprised by how easy it was and plan to make more pillow covers in the future.


We are planning to put up our Christmas tree and other Christmas decorations on Saturday.  I am so excited and plan to spend this week getting ornaments and decorations made.  

I'm linking up to 

Friday, October 28, 2011

Pinterest Project Linky Party


This week I have shared with you several projects and recipes that were inspired by a pin on Pinterest.  Today, I am excited to see a project that you have been inspired to make from Pinterest!  It can be a recent project, or one you've done in the past.  Link your project below to share!

I ask that you please link back to this post- sorry I don't have a blog button for you to use!

Today I'll share with you the most simple project I completed this week...a bored jar.

I'm sure you've seen this picture on Pinterest if you pin:

Pinned Image

I was showing Jeremy a couple of pictures and scrolling through my pins when he asked me about this one.  He suggested that we make our own bored jar and fill it with fun, cheap things we can do throughout the week when we get bored and sit around asking what we want to do.  I was all for the idea.

So we got out some index cards and brainstormed some fun, and some productive, ideas.  We included things like- play a card game, go get ice cream, and rent a movie.  We also included things like- do a load of laundry, clean the bathroom, and wash dishes.

We put our ideas in a mason jar that sits in the kitchen for easy access.


It is a simple idea that was originally meant for kids, but hey, we get bored sometimes too. :)

I have a few more projects to share with you through the weekend including some Christmas crafts.  I'm getting in the Christmas spirit!

I'm excited to see what projects you link below!

Thursday, October 27, 2011

Pinterest Project Week- Wrapping Paper Wreath

This week is all about actually completing some projects I’ve pinned on Pinterest.  I’ve dubbed it “Pinterest Project Week”.  Don’t forget, I’m hosting my first linky party on Friday for any Pinterest inspiration projects you want to share!

I have been collecting a lot of Christmas inspiration on my Pinterest board- “Rockin’ Around the Christmas Tree”. I plan to do a white and natural Christmas theme and I have been finding so many great ideas.

One of them was this wreath-

I love the look of it but wasn’t so crazy about the red.  I knew I had some pretty paper that looked similar so I decided to make my own wreath using this tutorial from the original pin. Here is how mine turned out!

wrappingpaperwreath1

It was time consuming but I think it was worth it in the end.  I had planned to use it for Christmas decoration but I hung it above our sink and it just feels that empty space so well I might just leave it there all the time (or at least until I get something else to put there)  I think I might just add a bow to it for Christmas.

wrappingpaperwreath


wrapping paper wreath2

The paper I used was from the dollar store and I cut out a wreath shape from poster board as the base.  In total it probably cost about $1.50 to make. 

Have you been working on projects this week?  Can’t wait to see them on Friday at the linky party!

Wednesday, October 19, 2011

Slipcovered Ottoman

Somehow Jeremy and I “inherited” a storage ottoman from Jeremy’s college roommates.  Jeremy used this ottoman for several years in college and it ended up being moved with all of our stuff to our new house.  Jeremy likes it and of course wanted to keep it and I of course thought it was ugly and didn’t match our furniture.  But I did enjoy having it to prop up my feet on so I decided to make a slipcover for it. 

             OttomanSlipcoverAfterbefore ottoman


I just used canvas drop cloth and first created a plain cube slipcover (which you can see in the picture below)
[100_2026%255B4%255D.jpg]

But I wanted to spruce it up a little more so I sewed on a pleated bottom and then hot glued a white trim piece around the seam.  I picked up the trim at a local thrift store for only 20 cents and the fabric was leftover from another slipcover project I’m working on.  Since we didn’t even pay for the ottoman, the total cost was only 20 cents!

This was a quick and easy project and I love the finished results.  I saw these same ottomans at our local Wal-Mart last week on clearance for $7 if you are interested in recovering one!

OttomanSlipcover

I was inspired by this slipcover from Dear Lillie.  She has a great tutorial up on how she made her slipcover!

I've linked up to:


freckled laundry

Wednesday, August 31, 2011

Ruffle Pillow- Finally Finished!

Way way back in March I posted that I was making a ruffle pillow.  Well, I finally finished it!! 

My sewing machine and I were having some issues for a while but I finally got them fixed this summer and I've been sewing away!  (All that time my sewing machine kept messing up, it was just that I was using the wrong size bobbin.  I didn't even know there were different sizes.  Go figure!  Just glad it was only a $2 fix!)


It's looking lovely on our bed!

Friday, May 27, 2011

Baby's Breath Bouquets


My bridesmaids are going to be carrying baby's breath bouquets at the wedding.  I showed you some inspiration photos here

I did a trial run of the bouquets yesterday.  I just picked up a couple of packages of baby's breath at Bi-Lo and as soon as I got home I set off working on it! I separated all the stems, including taking off the sprigs that were lower on the stems. 

I laid them out on the table so I could see all the stems shapes and sizes.  I started with the tallest in the middle and then added the shorter pieces to the outside.  I wanted to make sure I had a "bouquet shape".  I used two packs of baby's breath (a total of 6 stems) to make the bouquet.  I then used a rubber band to secure them all together (on the day of the wedding I'm going to use floral tape) and wrapped a ribbon around the stems. 


I wasn't sure about the size so I took a picture of myself holding it using the camera's timer (first time I had ever used it, so I was pretty excited about that)


I think it seems to be about the right size.  What do you think?  For the wedding should I make them smaller, larger, or are they just right?

The good thing is that it took me only about 5 minutes to throw this thing together.  So to make 5 of them I should be able to get them all done in less than 30 minutes the day before the wedding.  Another great thing

I love the romantic and wispy look of the baby's breath bouquets.  I love the price tag even more!  I only spent $8 for the trial run bouquet and my florist if getting several bunches for me at wholesale price for the wedding so they'll only be around $5 a bouquet!  You can't beat that! 


UPDATE: If you'd like to see how my bridesmaids bouquets turned out for our wedding, click here.
Related Posts Plugin for WordPress, Blogger...